JusProgDNS für iOS Betriebssysteme (iPhone/iPad) einrichten
![]() Mit JusProgDNS können Sie das Surfen im Internet für Kinder und Jugendliche auf Smartphones und Tablets mit iOS-Betriebssystem sicher machen. JusProgDNS ist schnell und einfach auf iPhone und iPad von Apple eingerichtet und funktioniert in allen Versionen.
Mit JusProgDNS können Sie das Surfen im Internet für Kinder und Jugendliche auf Smartphones und Tablets mit iOS-Betriebssystem sicher machen. JusProgDNS ist schnell und einfach auf iPhone und iPad von Apple eingerichtet und funktioniert in allen Versionen.
Hinweis: Die Filterung mit JusProgDNS im iOS Betriebssystem hat jedoch technische Grenzen, da Apple im iOS Betriebssystem nur sehr wenig Einstellungen erlaubt. JusProgDNS muss für jedes WLAN getrennt eingerichtet werden und ist für mobilen Datenverkehr nicht konfigurierbar. Der Umgehungsschutz ist unbefriedigend.
Für viele Nutzungssitutionen ist JusProgDNS für iOS eine gutes Schutz-System: Für z.B. über WLAN mit der heimischen DSL Box oder z.B. dem Schulnetzwerk verbundene Tablets ist JusProgDNS ein sinnvolles und wirkungsvolles Jugendschutzprogramm für iOS. Bei mobileren iPhones und iPads mit SIM-Karte, die häufiger auch außer Haus oder an häufig wechselnden Orten genutzt werden, empfehlen wir statt der Nutzung von JusProgDNS die Installation der kostenfrei nutzbaren JusProg Kinderschutz-App für iOS (iPhone und iPad).
Tipp: JusProg e.V. bietet für iOS Betriebssysteme (iPhone / iPad) einen kostenlos nutzbaren Kinderschutz-Browser. Dieses Jugendschutzprogramm für iOS bietet deutlich mehr Funktionen und Einstellmöglichkeiten als JusProgDNS, u.a. die Verwaltung von mehreren Kinderprofilen mit unterschiedlichen Alterstufen und einen Eltern-Modus. Ein Surfen mit alternativen Browsern (Safari) kann unterbunden werden. Den JusProg Kinderschutzbrowser für iOS erhalten Sie im Apple App Store (Link-Aufruf mit iPhone/iPad).
Schritt-für-Schritt-Anleitung für den JusProgDNS Jugendschutz in iPhone und iPad
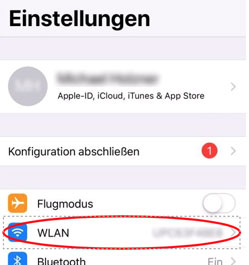
Öffnen Sie in Ihrem iPhone oder iPad die „Einstellungen“ (App-Icon) und wählen den Punkt „WLAN“ per Klick aus. Wählen Sie anschließend das WLAN aus, für das Sie JusProgDNS einrichten möchten, und klicken auf den Namen des WLANs. Das WLAN, mit dem Sie aktuell verbunden sind, ist vorn mit einem grünen Haken gekennzeichnet.
Die Einstellungen sollten für alle häufiger genutzten WLAN-Verbindungen wiederholt werden.
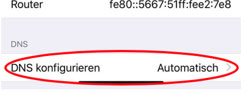
Klicken Sie dann im unteren Teil der Angaben auf der Folgeseite auf „DNS konfigurieren“
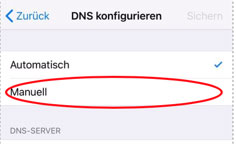
Standardmäßig steht die Einstellung auf „Automatisch“, wählen Sie stattdessen „Manuell“.
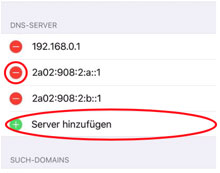
Klicken Sie im Bereich „DNS-Server“ auf das grüne Plus-Zeichen „Server hinzufügen“.
Wählen Sie aus der untenstehenden Tabelle die gewünschte Altersstufe aus und klicken auf das Plus-Zeichen davor. Es öffnen sich dann die Angaben zu IP-Adressen von JusProgDNS.
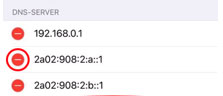
Wenn Sie auf „Server hinzufügen“ geklickt haben, können Sie die beiden IP-Adressen aus dem Kasten eingeben. Geben Sie oben die 1. IP-Adressen ein und darunter die 2. IP-Adresse. Die Angaben zu IPv6 benötigen Sie in der Regel nicht.
Die Punkte stehen bereits in den Feldern, deshalb brauchen und dürfen Sie nur die Zahlen eingeben.
Wichtig: Prüfen Sie sorgfältig, dass alle Zahlen richtig eingegeben wurden. Schon kleine Fehler führen dazu, dass Sie nicht mehr im Internet surfen können. In diesem Fall können Sie die Angaben an dieser Stelle wieder korrigieren.
Machen Sie anschließend einen Screenshot von den Angaben, die vorher bereits im Bereich „DNS-Server“ gestanden haben (oder schreiben diese ab), um ggfls. die Einstellungen später wieder zurückstellen zu können.
Klicken Sie dann auf das rote Minus-Zeichen, um die nicht benötigten Nameserver zu löschen. Dies ist wichtig, da sonst von den anderen Nameservern Webseiten „erlaubt“ werden könnten, die JusProgDNS für die Altersstufe blockieren würde.
Klicken Sie anschließend oben rechts auf dem Screen auf „Sichern“, um die Einstellungen zu speichern.
![]()
Herzlichen Glückwunsch, Sie haben JusProgDNS für iOS eingerichtet, Ihr Kind kann jetzt mit iPhone oder iPad in dem konfigurierten WLAN sicher surfen. Wiederholen Sie den Vorgang ggfls. für anderen häufiger genutzte WLANs.
Testen Sie, ob der Eintrag von JusProgDNS in Ihr iPhone oder iPad geklappt hat
Bevor Sie ein Kind an dem iPhone oder iPad surfen lassen, testen Sie als Erwachsener (ohne Beisein Ihres Kindes) zunächst, ob JusProgDNS im iOS Betriebssystem richtig eingerichtet wurde und der Kinderfilter für das Internet funktioniert.
Rufen Sie zum Testen des JusProg Jugendschutzprogramms für iOS zunächst die Webseite der Kindersuchmaschine www.fragfinn.de auf, um zu testen, ob das Endgerät weiterhin im Internet surfen kann. fragFINN ist „ab 0 Jahren“ freigeschaltet. Rufen Sie anschließend z.B. die Webseite einer bekannten Porno-Seite mit dem iPhone/iPad auf und prüfen, ob statt der erotischen Inhalte eine Blockingpage angezeigt wird. Bei verschlüsselten Webseiten (https://) wird die Verbindung abgebrochen.
Ist der Test erfolgreich, können Sie Ihr Kind mit dem iPhone oder iPad in dem konfigurierten WLAN surfen lassen. Ist der Test nicht erfolgreich, prüfen Sie bitte, ob Sie alle Einträge und Schritte im iOS Betriebssystem richtig vollzogen haben und informieren sich ggfls. in unseren FAQ.
JusProgDNS im iOS Betriebssystem umgehungssicher machen?
Wenn Ihr Kind in einem Alter ist, in dem es die oben gemachten Einstellungen bei den Nameservern eigenständig wieder zurückstellen könnte, sollten sie statt der Nutzung von JusProgDNS die Nutung des JusProg Kinderbrowsers prüfen. Denn in den Einstellungen kann die Nutzung anderer (ungeschützter) Browser unterbunden werden.
Leider bietet das iOS Betriebssystem von Apple nur eingeschränkte Möglichkeiten zur Absicherung einzelner Funktionen und Einstellungen – leider ist der Zugang zu den Nameserver-Einstellungen nicht dabei, so dass sich diese derzeit auf diesem Weg nicht absichern lassen. Wenn Sie einzelne Funktionen unterbinden möchten, so geht’s:
- Rufen Sie die „Einstellungen“ auf
- Tippen Sie erst auf „Allgemein“ und dann auf „Einschränkungen“
- Legen Sie nun mit „Einschränkungen aktivieren“ eine PIN für diese iPhone-/iPad-Einstellungen fest, die sie sich gut merken können, die Ihr Kind jedoch nicht kennt (nicht der Pin des Gerätes oder der SIM-Karte)
- Schalten Sie den Zugang zu den „Einstellungen“ aus, die Ihr Kind nicht ändern können soll.
Eine weitere Möglichkeit zur Absicherung ist der „Geführte Zugriff“. Bei dieser Funktion ist immer nur eine App aktiviert. So geht’s:
1. Rufen Sie die „Einstellungen“ auf
2. Tippen Sie erst auf „Allgemein“ und dann auf „Bedienungshilfen“ und anschließend auf „Geführter Zugriff“
3. Aktivieren Sie den „Geführten Zugriff“
4. Aktivieren Sie die „Codeeinstellungen“ und vergeben eine PIN
5. Starten Sie die App, die Sie einschränken möchten und tippen 3 x auf die Hometaste. Es kann jetzt nur noch diese eine App genutzt werden.
6. Um den Modus „Geführter Zugriff“ wieder zu beenden, tippen Sie 3 x auf den Startbildschirm und geben die oben vergebene PIN ein. Der Modus wird beendet.
Diese Funktionalitäten sind leider realativ unbefriedigend, aber Apple erlaubt auf iPhone und iPad keine weitergehenden Absicherungen. Alternativ können Sie die Jugendschutz-Einstellungen des iOS-Betriebssystems nutzen.